Everyone that has a VMware environment deployed must update their vSphere stacks to stay current and up to date with the latest security releases right, so in looking at good security practices your VMware vCenter Server Appliance (VCSA) access to the internet. With that brings us Update Manager Download Services (UMDS). This server should be deployed in a demilitarized zone with strict access controls in place, allowing out bound specific sites and inbound specific file types. This post is for those that are not LINUX savvy. If you are savvy, then you will want to go straight to part two of this series.
This document will be broken down in a two-part post, first to go over the initial installation and the second post
(Part 2) will go over the specific configuration.
Getting Started
The only supported Operating systems for VMware update manager download services are RedHat Enterprise or Ubuntu. You will want to download and deploy either RedHat Enterprise or Ubuntu, in this post I will be walking through the Ubuntu configuration.
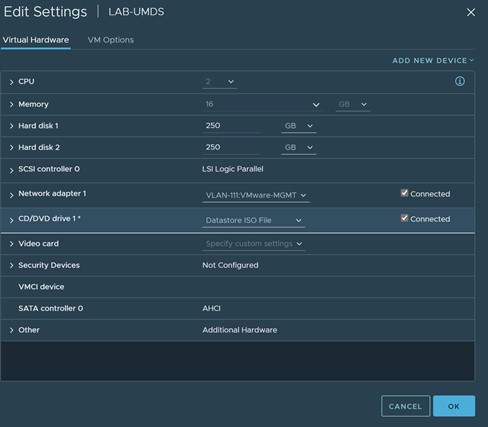
The Storage layout for your Ubuntu server should have enough room for all your required updates to include new firmware as well. In the below example I decided to enable and leverage the Logical Volume Manager to ease of manageability.
So please follow your general virtual machine deployment best practices with selecting the appreciate cluster, data stores and indusial virtual machine configurations. My example configuration is seen below.
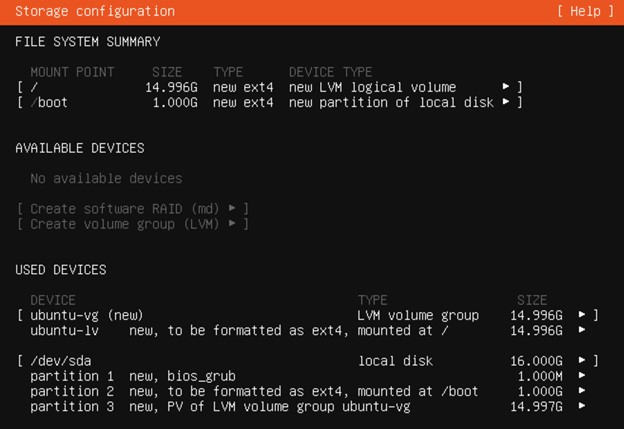
Once your VM is deployed and you power on the server you will be presented with the below options, so we will start there.
Once your installation is complete and rebooted you will want to ensure you have the latest updates as well as a best practice, so please check for updates.

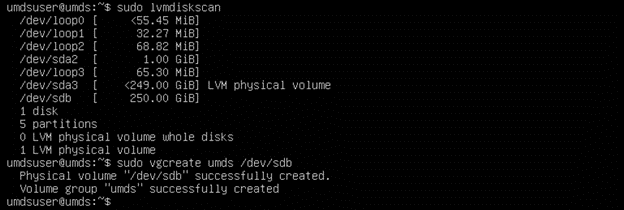
Now that you have the most up to date software you will want to identify your file system so you can create another directory to place the installation files for UMDS.

Next you want to layout or create your new volume group & logical volumes based off your second 250GB disk. Since the updates need to be separate, I created two separate logical volumes as shown below.

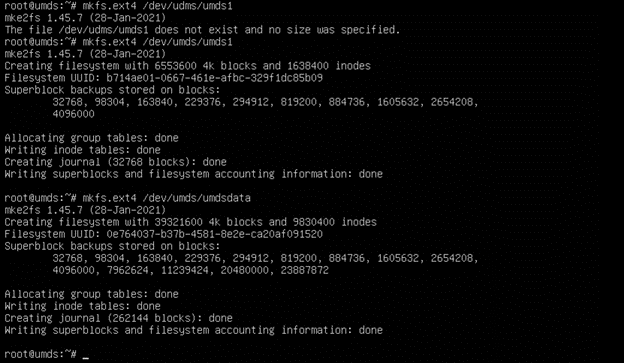
Now you will need to layout the file system on your newly created logical volumes as seen below.
Next create your directories as shown below.

Next you will need to mount the new file system.

Now we need to extract the UMDS.tar file and place it in the new directory we just created.
I created the UMDS1 directory for this.
I am also using WinSCP to extract the downloaded file to the Ubuntu server as shown below.

Now you will need to extract the tar file to the same directory with the following command.

Once this completes the actual installation is completed with executing the vmware-install.pl script as shown below.

Now you will provide the location of the installation directory and the directory were the patches will be downloaded as shown below
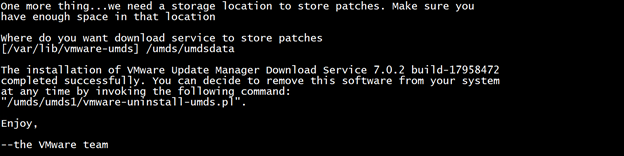
Once you get to this point you have successfully deployed Update Manager Download Service (UMDS).